
Australian Aeromodelling Groups - Bonus Updated April 5, 2003
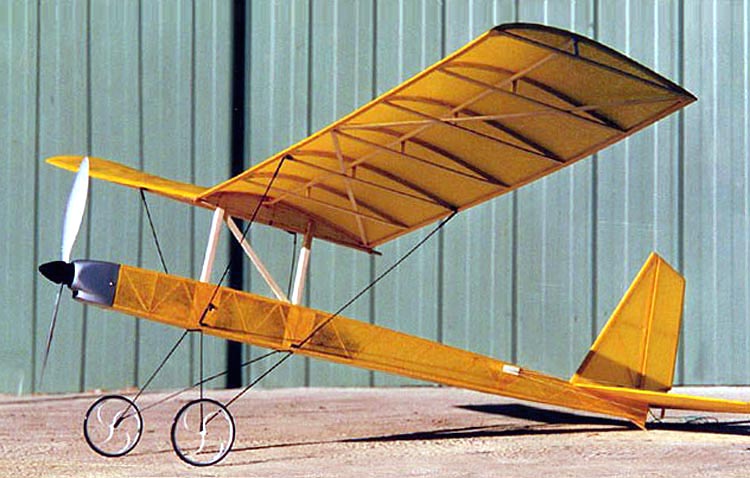
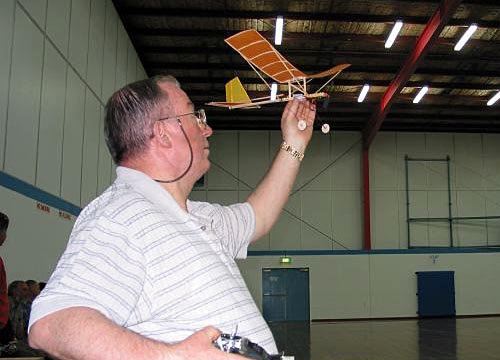
A Tale of a Rat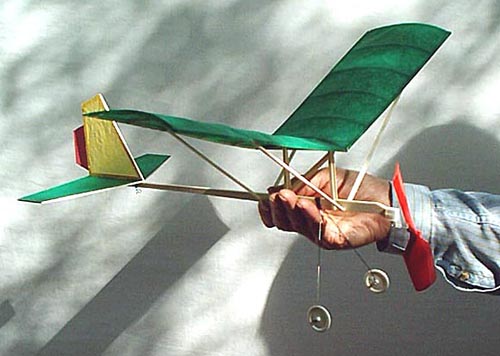 The author's Hangar Rat from Fly In Models
The Hangar Rat Story http://www.swoot.com/RatsNest.html by Harry Barr In the year of 1979, I was Chief Engineer for a fleet of aircraft owned by Seneca College of Toronto. Our fleet was hangared at Buttonville Airport, just north of Toronto and also, this airport was the home base for a flight training and charter service, known as Toronto Airways. Shortly after taking the position with Seneca, I became acquainted with the Chief Engineer of Toronto Airways and as time went on we became good friends. His name was Ross Campbell, and during conversations over coffee, we found that we were both modellers. A short time later, I happened to build a Sig indoor trainer (the Sig Parasol) and took it to work one day to test fly in the Seneca hangar. Ross joined me, and was hooked, and the following week he showed up with his own version of the same model. During lunch breaks, we flew these models, and in the natural course of events, a friendly competition developed. As often happens, advantages in performance became paramount to winning, and we were both looking for "a bit more time". About this time, I felt that a cambered wing section might give me an edge, and proceeded to build a wing along those lines. The wing area remained the same and no other changes took place at that time. This was a surprise to Ross, but he was quick to respond. I helda slight edge for a while and then Ross countered with a wing of his own design, and so it went. Many changes took place in this period, such as a slim downed fuselage, enlarged tail surfaces, parallel lift struts, a better prop hanger, lighter wheels, and experimentation with rubber sizes. We eventually ended up with what became known as the "Hangar Rat". We spent many hours flying this little aircraft, and despite a low ceiling (15 feet) we consistently put up times that ran between a 1 min. 05 sec's to 1min. 08 sec's. Neither of us was never able to best the 1 min. 08 sec's in that building. Dawn was drawing to an end. I changed jobs and was to spend some time in various locales in Canada, and the U.S.A.. As a result I lost touch with Ross as this period ended. Bitter sweet memories indeed. Modelling has always been my first passion, and despite working, raising, (and paying), for a family, home, etc., I always managed some time to build and fly model aircraft. The HR was not forgotten during this period; and short term memory loss was still a few years down the road. As a result, in the early part of 1979, in a brilliant burst of babbling insanity, I produced a drawing and a one page run-down on how to put this little aircraft together. Before I lost my nerve I addressed it to Bill Northrop of "Model Builder" Magazine, and dropped it into a mail box.....you remember them don't you? No Clancy, there was no email in those days! (gasp!) Sanity finally prevailed however and other things drove the HR from my mind as I wrestled with house repairs, work, etc. And then......(sounds of a fanfare) the mail box (yes Clancy, again) spewed forth a letter from Mr. Northrop for my attention. Upon opening this missive, I was extremely surprised to find a cheque for $60.00, and a pleasant letter thanking me for my article on the HR, and advising me that I could look forward to seeing it published in the month's to come. So much for memory loss; I had completely forgotten the article until this letter arrived! True to his word, Mr. Northrop published the article in the July 1979 issue of the magazine, and I became a published author. Wow! Field Rat Fun Fly Page
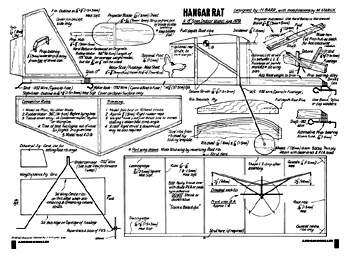
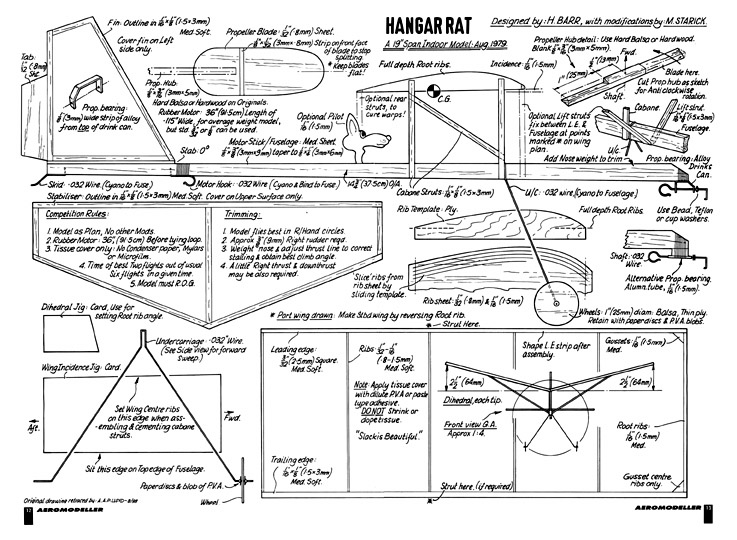
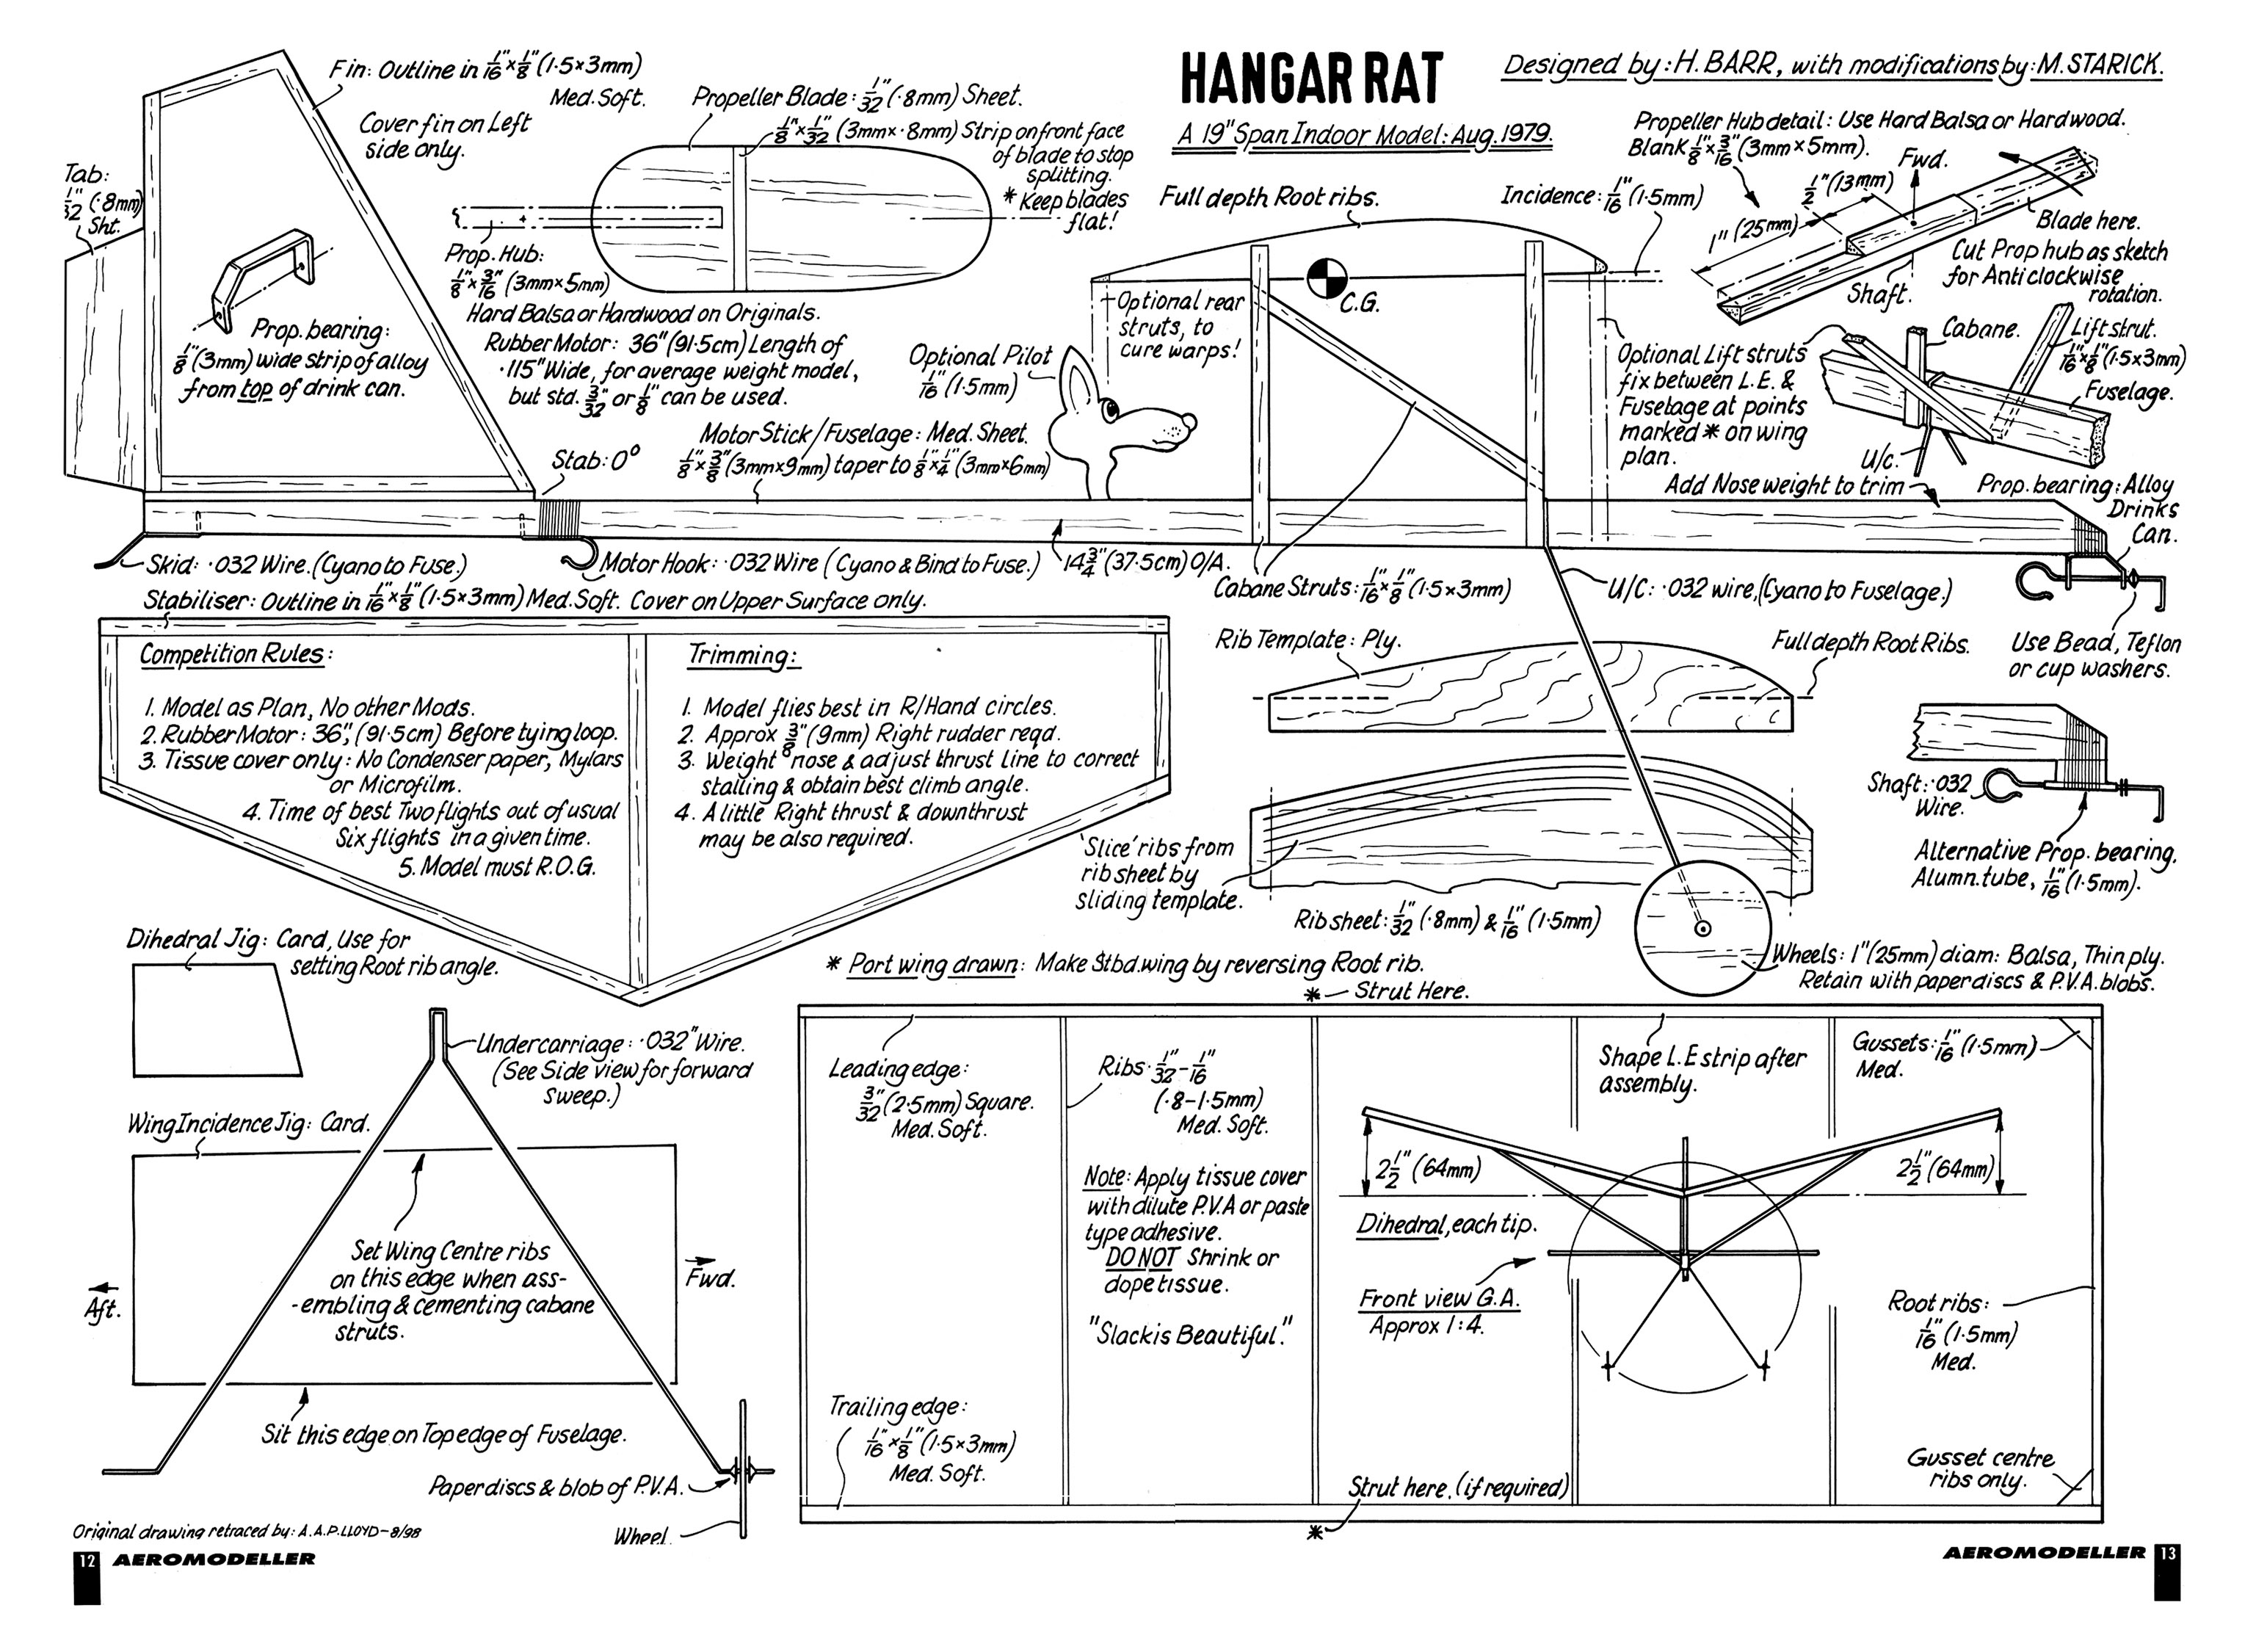
The Hangar Rat by Harry Barr, Model Builder, August 1979 ... A cute little rubber job that is easy to build and fly History "Hangar Rat" owes its existence to the "Sig Parasol," a simple, easy-to-fly, tissue-covered profile model. Having built one of these with a cambered wing, I proceeded to fly it every lunch hour in the hangar, where I worked, until it was so tattered it was retired to a place of honor above my bench. Needing another fun machine that could be built in a hurry, "Hangar Rat" evolved, using the same airfoil I had used on the Parasol. It has been a success right from the first flight, with average flight times under a 20 - foot ceiling of 50 sec., with a best flight to date of 1:08 and many flights over a minute. It is easy to adjust and build and will bring pleasure to both the beginner and the jaded R/C nut (like me). It brings back memories of simpler times when modeling was less complex and expensive. If you are a beginner, follow the plans closely and you will be rewarded with a fun flying machine. If you're an old hand at the game you probably have your own ideas about a lighter airframe, better prop, etc. Regardless, have fun! Construction Let's start with the wing and get that miserable so-and-so out of the way. Using the side view of the fuselage, cut a template from 1/32 plywood of the rib profile. Reinforce the edges of this template with a Cyanoacrylate type glue to toughen them against knife knicks. Using this template, slice out ten ribs 3/32 deep from 1/20 sheet and two full depth ribs from 1/16 sheet.
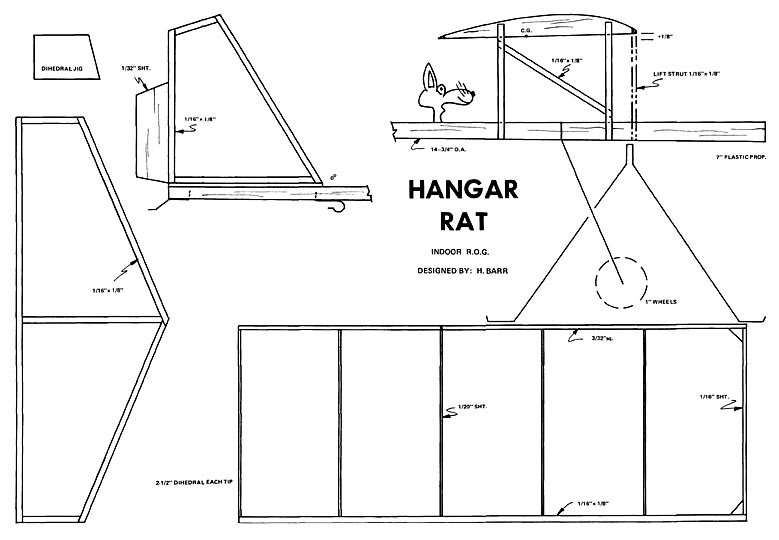
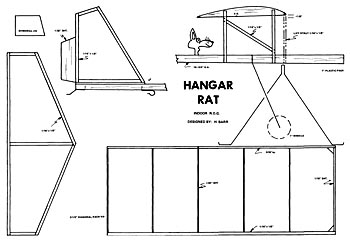 Hangar Rat - Harry Barr Original, 1979 download a A4@72dpi [100Kb] or A4@300dpi [400Kb] plan
Protect your drawings with Saran Wrap or something similar and pin the wing frame to your building board. Use the dihedral jig to set the root rib angle accurately and glue the root rib (the full-depth rib) in place. Add the gussets at the root and allow to dry thoroughly. Since the wing is bilaterally symmetrical, the same wing drawing can be used to build the second panel merely by moving the root rib to the opposite end. Once both panels are framed up, gently sand the leading edge to a rounded contour and re-glue all joints. Do not join the wing panels at this time! Set them aside for now. The tail surfaces and cabane structure are built flat over the drawings using the time-honored method of pinning and gluing. The only point worth noting here is the method of joining the stabilizer leading edges. This is stronger than a butt joint. The 1/32 trim tab is cut out now, sanded, and set aside. Do not glue to the fin at this time. Lightly sand surfaces and check all glue joints. The motor stick is a firm piece of 1/8 x 3/8 balsa. Pick a good straight piece and after cutting to length, taper the bottom (from front to rear) to 1/4 x 1/8. Sand to suit your personal tastes. The wire parts are bent up from .025 music wire. Note that the tail skid and rear hook have a tang that pierces the motor stick approximately 1/8 of an inch. Bind the hook and skid neatly with cotton thread and cement securely. The landing gear is pressed over the motor stick in the proper position and it is also bound and glued in place. Slip a pair of 1-inch wheels in place over the axles and bend the axles upward to retain the wheels. The wings and tail surfaces should now be covered. Use the lightest possible grade of tissue available, iron it flat, and attach with water-thinned white glue. Cover only the top of the wings and stabilizer and one side of the fin. Do not use any dope and do not shrink the tissue. Now that the wings are covered, cement both butt ribs lightly and join, using clothespins as clamps until the glue dries. At this point, glue the cabane to the wing in its correct position. Ensure that it is perpendicular when the wing is level (equal dihedral under each tip). If such is not the case, apply your sanding block to the surfaces that contact the wing ribs until corrected. (Note: the cabane glues to the side of the root rib.) Accurately assemble the tail group to the fuselage. It may be necessary to remove a small sliver of tissue from the stabilizer center rib in order to get a good bond between the fin and stabilizer. Add the trim tab at this time, with about 3/8 inch right offset, Tack-glue lightly to allow for adjustment. Cut "Mr. Rat" from foam or balsa, decorate, and glue in place. I used a 7-inch plastic prop, and the prop hanger was the one supplied with the Sig Parasol. This simply slides onto the stick. If you wish, a metal strap or aluminum tube type can be used instead, as long as it's securely bound and glued. Make sure that 3°ree; to 4°ree; of down thrust is built into the hanger, no matter what type you use. Use a drop of rubber lube on the prop shaft. At this point, pin the cabane to the fuselage and by trial and error move it fore or aft until the "Rat" balance at the point shown. Because of the large stabilizer, the CG, is further aft than might be expected. Once balanced, mark the correct position of the cabane and glue it in place. Ensure that the wing is properly levelled and the incidence angle is correct. Adjust to suit. You can now add the 1/16 x 1/8 lift struts. The small "X" on the wing drawing gives its location on the wing, and the side view of the fuselage indicates the struts' position. Although the struts' forward position is unorthodox, I placed it there for a reason. if the "Rat" contacts an obstruction, the strut takes the brunt of the collision and protects the leading edge of the wing. It's much easier to repair the strut than the wing. If desired, initial glides can be done with the rubber motor left off. It has very little if any effect on the C.G. Adjust the glide for a flat right turn of about 20 feet in diameter. My "Rat" flies best on a 17 inch single loop of flat 1/8-inch rubber. This is for the aforementioned 20 - foot ceiling. No doubt you'll want to experiment to find the best prop/rubber combination for your own site. The wheels can be bent forward or back for final trim adjustments. So now you can pack in the winds and have at 'er. I hope you enjoy the "Hangar Rat" ...I still do!
Max Starick : The Hangar Rat in Australia a personal recollection by David Hipperson Dear Russell, In response to your mail I can't help you much beyond where you are except with the Hangar Rat story. In recounting this series of events please be very aware that I am not seeking any recognition for myself or in any way attempting to diminish anything that Max Starick did. You'll just have to believe this account is as accurate as I can recall it. I'd been an aeromodeller since the early 1950's flying F/F, C/L and RTP but like all young men somewhere in my late teens I'd discovered girls and sports cars and model aeroplanes disappeared off the chart. After migrating to Australia I'd been tolerably successful in motor sport driving at Claremont Speedway and then in circuit racing ar Wanneroo in both Mini Coopers and Jaguars. However in 1973 I left Kodak and started working full time for an entrepreneur called Frank Baden-Powell in WA. I'd already worked for Frank part time for several years as Stage Manager at both the Perth and Fremantle Old Time Music Halls. Then he asked me if I would manage Dirty Dicks Elizabethan Restaurant in Cambridge St, Wembley. A few months later this changed when he asked me to come to Melbourne and run first the Skyhigh on Mount Dandenong (where I met my wife) and later Dirty Dicks in Queens Road. Racing cars were too much to drag around Australia so I sold up, bought myself a Triumph GT 6 and went back to aeromodelling attempting to throw myself into R/C. From Melbourne Frank asked me to move first to the Sydney and Brisbane venues but eventually to be put in charge of the creation and opening of Dirty Dicks Adelaide. The location of Dirty Dicks was in Pirie St and just round the corner in East Terrace was a model shop and it was there I met Max Starick one Saturday morning. Max worked for Telecom in those days but in the model shop part time. Well, once an aeromodeller always…. etc. Anyway the long and short of it being Max took me under his wing, introduced me to the Constellation club and he also taught me to fly R/C. I'd been having the greatest of difficulty until Max got me building Old Timers, bigger and somewhat slower than my previous efforts they gave me more thinking time! This was a big step forward from my build one, crash one per week! Max was an absolute delight to be with and as I was virtually alone in Adelaide during the conversion work on the restaurant he and his wife Edna really looked after me. I frequently had dinner with them at their home in Greenacres where Max had converted the end of his garage into two spaces, a workshop and a magazine repository. His workshop was miniscule with a bench down each side of a room that I guess was only about five or six feet wide and about eight feet long. In the other room his store of magazines staggered the imagination. Max had been in the Navy in WWII and yet had still managed to continue collecting. He had Aeromodeller back to issue number one(published in the mid-thirties) as well as enormous collections of Air Trails, Model Airplane News, Radio Modeller, RCM, RCM & E and endless similar. He introduced me to Bill Northrop's Model Builder and I still have my collection. Max had also seduced me into flying Peanut Scale, Indoor chuck glider as well as Penny Plane and one evening after dinner we were discussing possible ways to drag more unwitting victims into flying indoor. We both decided that E-Z-B and Penny Planes, then the current starter classes were a bit delicate for the average ham handed R/C builder/flyer to tackle. They also required specially stripped rubber and fairly difficult to produce propellers. I'd add that Max had a superb rubber stripper that he'd purchased from somewhere in the then Eastern Bloc (I believe Czechoslovakia) and I could get my rubber from him but for the average modeler it would have to be standard 1/8 or 1/4. As 1/4 would be far too heavy we needed a design that used 1/8th and it was at this point I recalled seeing Harry Barr's Hangar Rat in a back issue of Model Builder and after dragging out Max's copy of the magazine we thought this could be a near perfect "introductory" class. By the time I next saw Max he'd actually produced some Rat kits which he proposed to sell at club meetings for $5.00. I know because I bought some of these and still have one unopened.
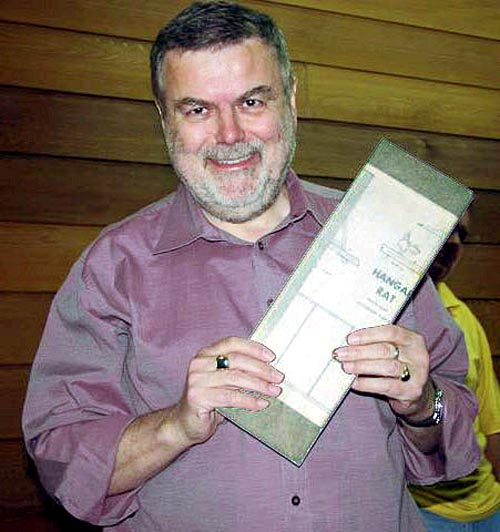 David Hipperson and an unopened, Max Starick Hangar Rat Kit
I got progressively busier with the restaurant but still found time for building and flying, remaining close to Max until I eventually returned to WA. When Jan and I got married Max's eldest son and his wife drove over to attend the wedding. Alas, one thing and another kept us from being as close as we should although Jan and I would visit Max and Edna about once every year or eighteen months. We actually stayed with them when we went to the first Australian GP held in Adelaide in the eighties. By that time Max had really established the Hangar Rat class and to my knowledge produced over 5000 kits all by hand and still from that tiny workspace.
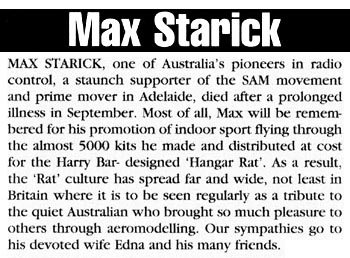 Max Starick Aeromodeller, Dec. 1997
He was what I really would refer to as a "gentle"man. A member of the Uniting Church Max seemed to derive genuine pleasure from helping others and in my experience nothing was too much trouble for him. His achievements and determination particularly his prolific output of Hangar Rats and his help to beginners is made all the more remarkable in that Max suffered from Angina and to my knowledge had at least one heart by-pass operation. I count myself fortunate enough to still have an early ED Bee diesel that Max gave me as well as many happy memories. Though I would never wish to take any credit for it I have on occasion wondered had I not been at the Starick's for dinner that evening and had the conversation not drifted in the direction it did and had I not remembered the Hangar Rat whether the class would have ever would have got to where it is today.
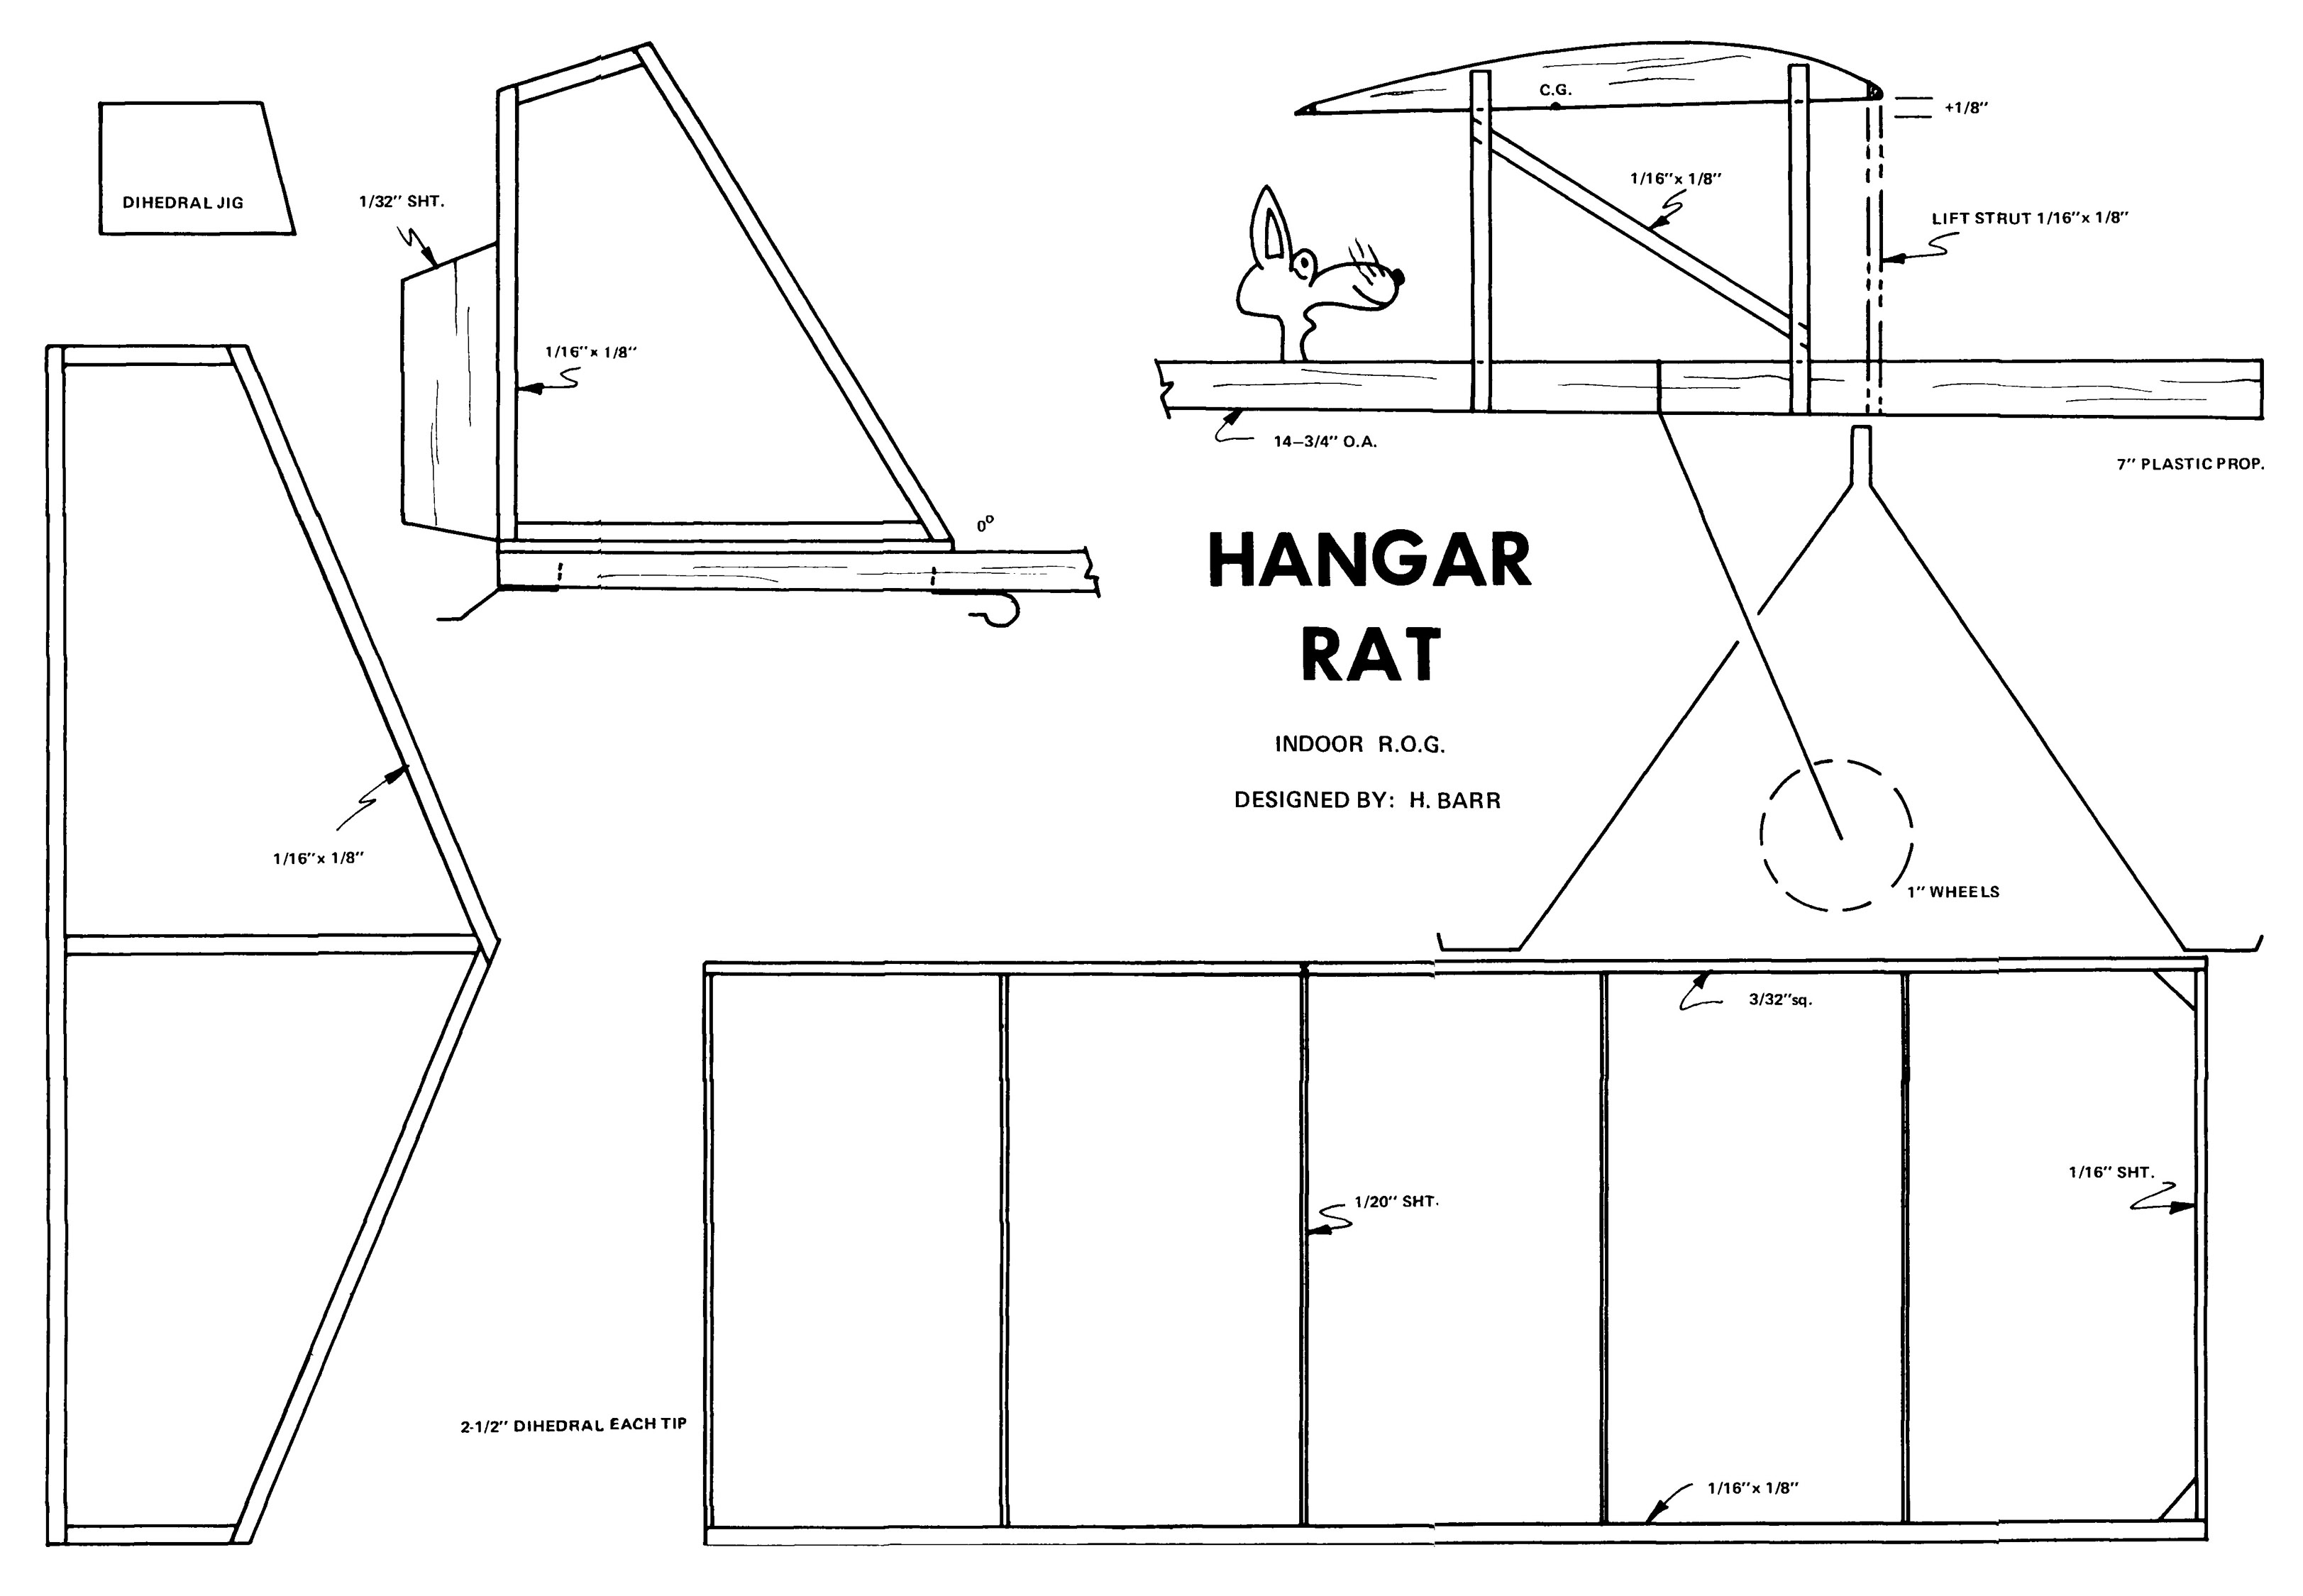
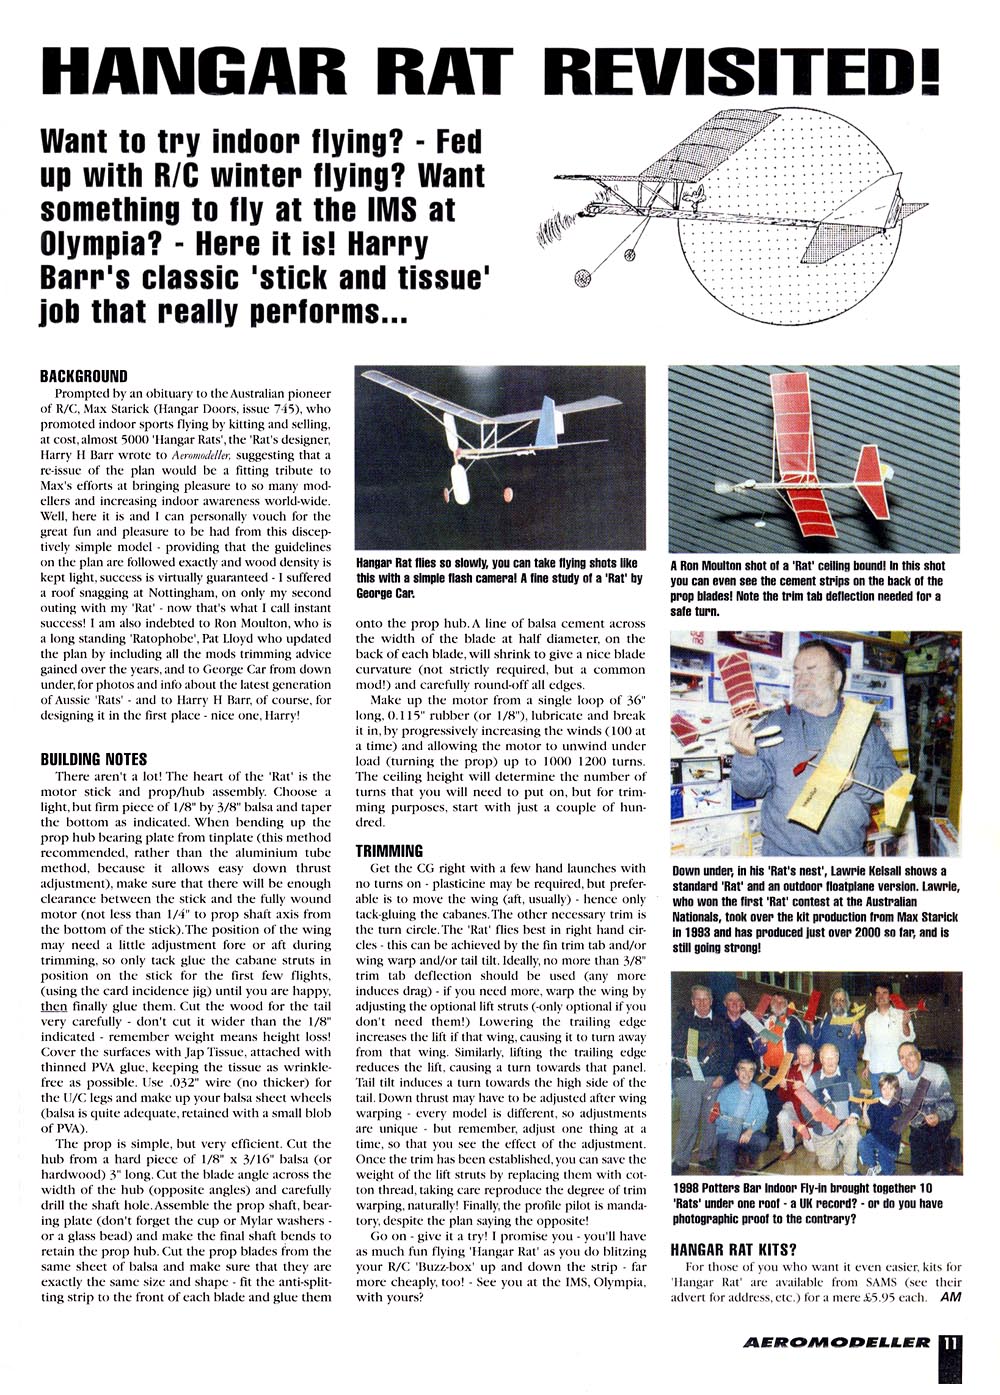
 Hangar Rat Revisited Aeromodeller, Vol 63 No. 757 20 Nov -17 Dec. 1998 download a 1000pixel image
 Hangar Rat - Max Starick Variant 2, c.1980 Aeromodeller, Vol 63 No. 757 20 Nov -17 Dec. 1998 download a A4@72dpi [212Kb] or A4@300dpi [1.1Mb] plan
Indoor Electric Radio "King Rat" Some time ago at the AEFA indoor, I watched as a small stick and tissue, rubber powered model was launched. Circling upwards, it collided with the backboard of the basketball hoop, losing all forward momentum. Then, from a complete stall, it dropped neatly under the board, recovered headway and flew on in level flight. "There lies salvation for the RC challenged", I thought. Further enquires revealed the model to be a "Hanger Rat", sourced from "Fly In Models" at Murray Bridge SA. Among the thousands of Hangar Rats sold, some had been successfully converted to Micro RC, usually retaining the benign flight characteristics. These micro conversions were quite expensive as they utilised specialist micro motor, radio and actuator gear. The arrival of mass produced "pico" and "naro" R/C equipment prompted Fly-In Models to develop a larger (double) size "King Rat" as an affordable electric RC indoor slow flyer.
 John Morrison's "Fly-In Models - Radio King Rat"
Retaining the geometry of the original Rat with wing loadings of around 9g per dm2, attributes of slowness, extreme "cornering" ability and the mildest of stalls were assured. The "Fly In Models - Radio King Rat" is the basis of this project. ...more
The 'ElectroRat' : An electric conversion for the Hangar Rat by Peter Mather taken from an email trail in early 2003 I can strongly recommend the Hangar Rat as an electric conversion, straight from the rubber kit. Mine flies beautifully - just like a Rat! Friend Tom Brooks has also built one using the 2.75:1 KP00, and it flies equally well with a little less prop.
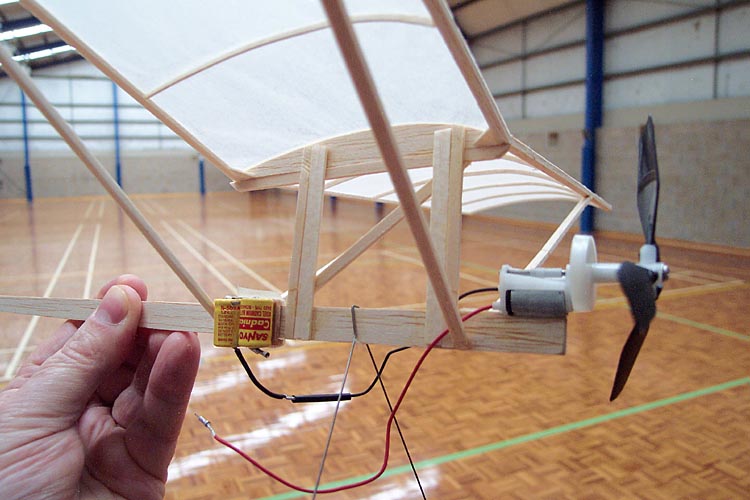 Peter Mather, electric 'Hangar Rat'
I used a geared KP00 motor (4.75:1 gearing), on two 50mAh NiCad cells. Initial test flying was with the kit red plastic prop - lovely flight pattern and superb atmosphere, but overloaded motor and cells. I modified the kit prop progressively by trimming 3mm at a time from the trailing edge of each blade to reduce blade area and pitch. This increased power and thrust at each trim, with reduced current draw, but was till overloading the motor and battery. Suspect that the kit prop would need around 8:1 gearing, which would have to be home made. Have also successfully tested balsa carved props (great therapy, see: http://website.lineone.net and http://www.mindspring.com ), but these worked too well and kept smacking the ceiling! The K&P variable pitch screw-in props might be suitable for stirring small tins of paint-I have several if you wish to try. The best performance solution for this model turned out to be the K&P folding props supplied with the 2.75:1 motor. These have alternative hubs (two, three or four blades) and blades (white with 45mm pitch and black with 60mm pitch), so can give a wide range of thrust and current draw for experimentation and trimming.
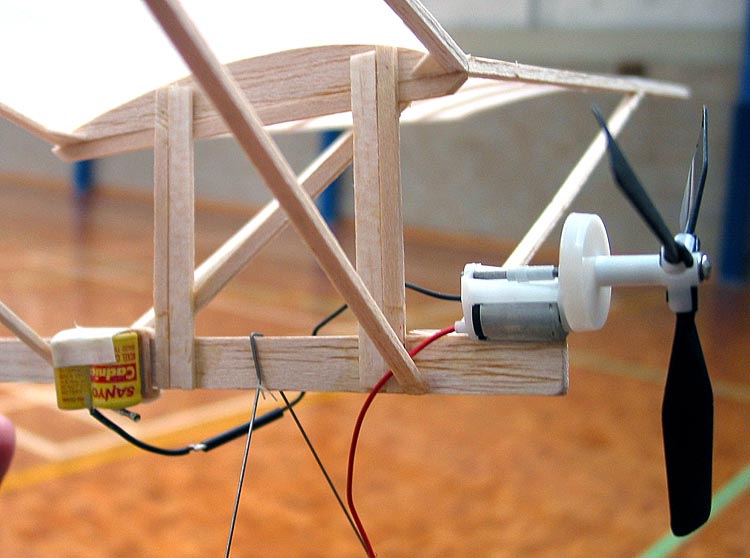 Peter Mather, electric 'Hangar Rat'. Detail
The best duration performance has been with three black blades, giving a long, slow climb, good cruise, and slow descent under power to land just as the battery 'dumps'. Note, this closely parallels the ideal trim for rubber power, except that we are after maximum revs to minimise current draw. Best flight time so far is just over two minutes on a charge of about 22mAh (a bit less than half of a full charge). There is no switch, just a single pin plug to connect and disconnect the battery (or you can use headphone socket as charge point/switch as per the KP00 instruction sheet). The Hangar Rat kit is $8.50 or so from Fly In Models (Lawrie Kelsall, Murray Bridge). K&P bits and pieces same source. KP00 direct drive motor is around $A15.00, geared ones are more expensive, heavier, but much more efficient -around $A40 or so. I moved the wing forward one inch (25mm) to help get the CG in the right place without having to put the batteries right down the back somewhere. Have also finished up reinforcing the centre cabane structure to ease impact damage with all the extra mass of the electrics. Total mass around 27gm. One other point for the ElectroRat- make arrangements for both side and up/downthrust to be adjustable. I didn't, and the lack has given me some trimming challenges. The easiest way to do this would be to leave the mounting lugs on the motor/gearbox frame and mount it as designed using screws and soft washers (small fuel tubing) to give a flexible mounting. Trim for free-flight is by setting up the glide, or power off trim with centre of gravity and aerodynamic adjustments (packing, trim tabs etc), then sorting out the power pattern with thrustline adjustments. The aim being to finish up with the same turn radius on climb and descent, with no stalling or diving in either mode. Standard Rat trim is right/right, but I finished up changing to left/left on mine to ease the trimming difficulties with no thrust adjustment available and changing props to optimise engine run/thrust. All good fun. My 'Little Black Box' charger was a present from Reg Goudge, and contains four 1200ish nicad cells, an LED, a switch and a resistor to limit the current. Two possibly simpler methods (both of which I use on various setups) are:
Have also heard that a direct charge will work if you simply have one cell more in the charging pack of large capacity cells (from your spares or discards) and connect straight to aircraft pack of one less little cells-eg three cell 1200 pack (3.6V) to charge two cell 50mA flight battery. Timed charge again, by 'suck it and see'-start with 10 secs and work up.
When friend Paul Riseborough got hold of some of the elusive `Depron' foam, I was keen to try out the material and decided to go for a well proven aerodynamic and structural design as a test bed. The Hangar Rat was the obvious choice, so I cut out a few ribs using the Rat template from my kit, and went to work.
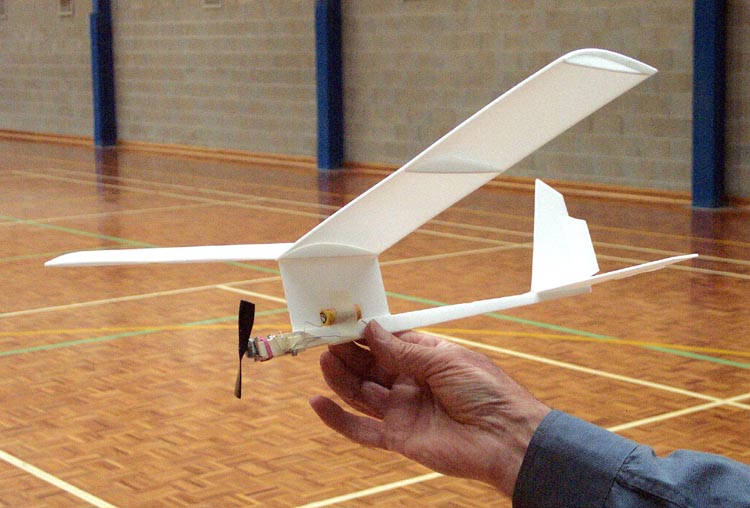 Peter Mather, Depron 'E-Rat', v1.0
The model is made entirely from 2mm Depron, except for a two-sided balsa tray for the motor to sit in. The wing was curved for camber, before gluing, by rolling it on the carpet with a cardboard tube. The foam was then weighted and pinned to the building board over the pre-glued ribs, and left to dry (glue was Weldbond, a high-tech white glue, but others will also work fine). The fuselage is laminated from the foam, three laminations at the rear, and five at the front to blend into the motor. Tail surfaces and pylon were simply cut from Depron from the plan, and the pylon is integrated into the centre fuselage lamination. Power is two 50mAh NiCad cells feeding through 8A household fusewire and a Dick Smith subminiature phone socket to a cheap (ten for $US15) motor that looks like a KP00 but is slightly heavier (5.1gm vs 3.6gm) and higher resistance (happier on more cells, but no good on a single cell). Source: , Todd's Models The motor direct drives a Union 80 push-on prop, and performance was so brisk that the prop is now running at around 50mm diameter to curb the climb.
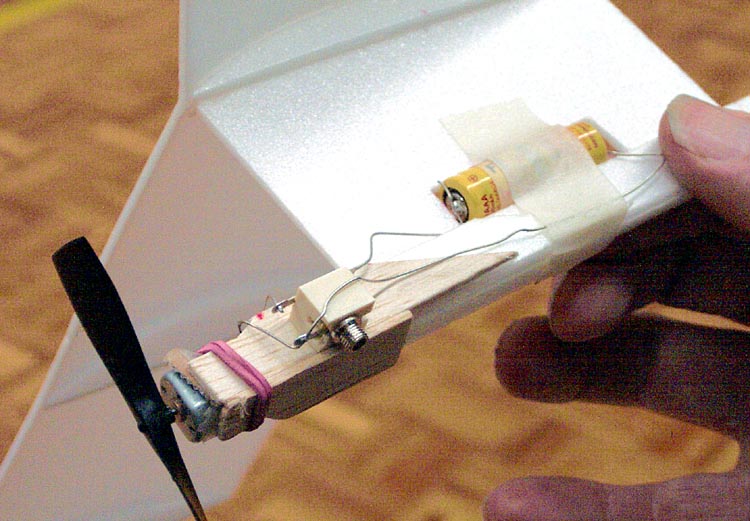 Peter Mather, Depron 'E-Rat', v1.0. Detail
The motor is held into its two-sided mount by a small rubber band, so thrust is readily adjustable with thin ply packing. The basic trim needed paper trim tabs for down elevator and left rudder, a lot of right thrust (fair enough) and a swag of upthrust (beats me!). One possible culprit is the increased wing incidence (3mm as against the standard 1.5mm of the Rat) built in by the builder. All up weight came out at about 26gm, and I was so concerned about the reduced power from the motor that I left off the undercarriage. Subsequent mods involved cutting big holes in all the surfaces, and covering them with Jap tissue, while cutting curves into all the tips to pretty up the lines. This saved three grams overall, and brought the prop down several sizes to give the same performance. Duration is around two minutes in a standard gym. The next plot is to turn it into a pusher, and maybe add an undercarriage for ROG flights and more elegant landings. Perhaps the most successful feature of the design is its durability: you can carry it around without a box, and hand it to a beginner with confidence that he/she will have a lot of fun with very little risk of damage.
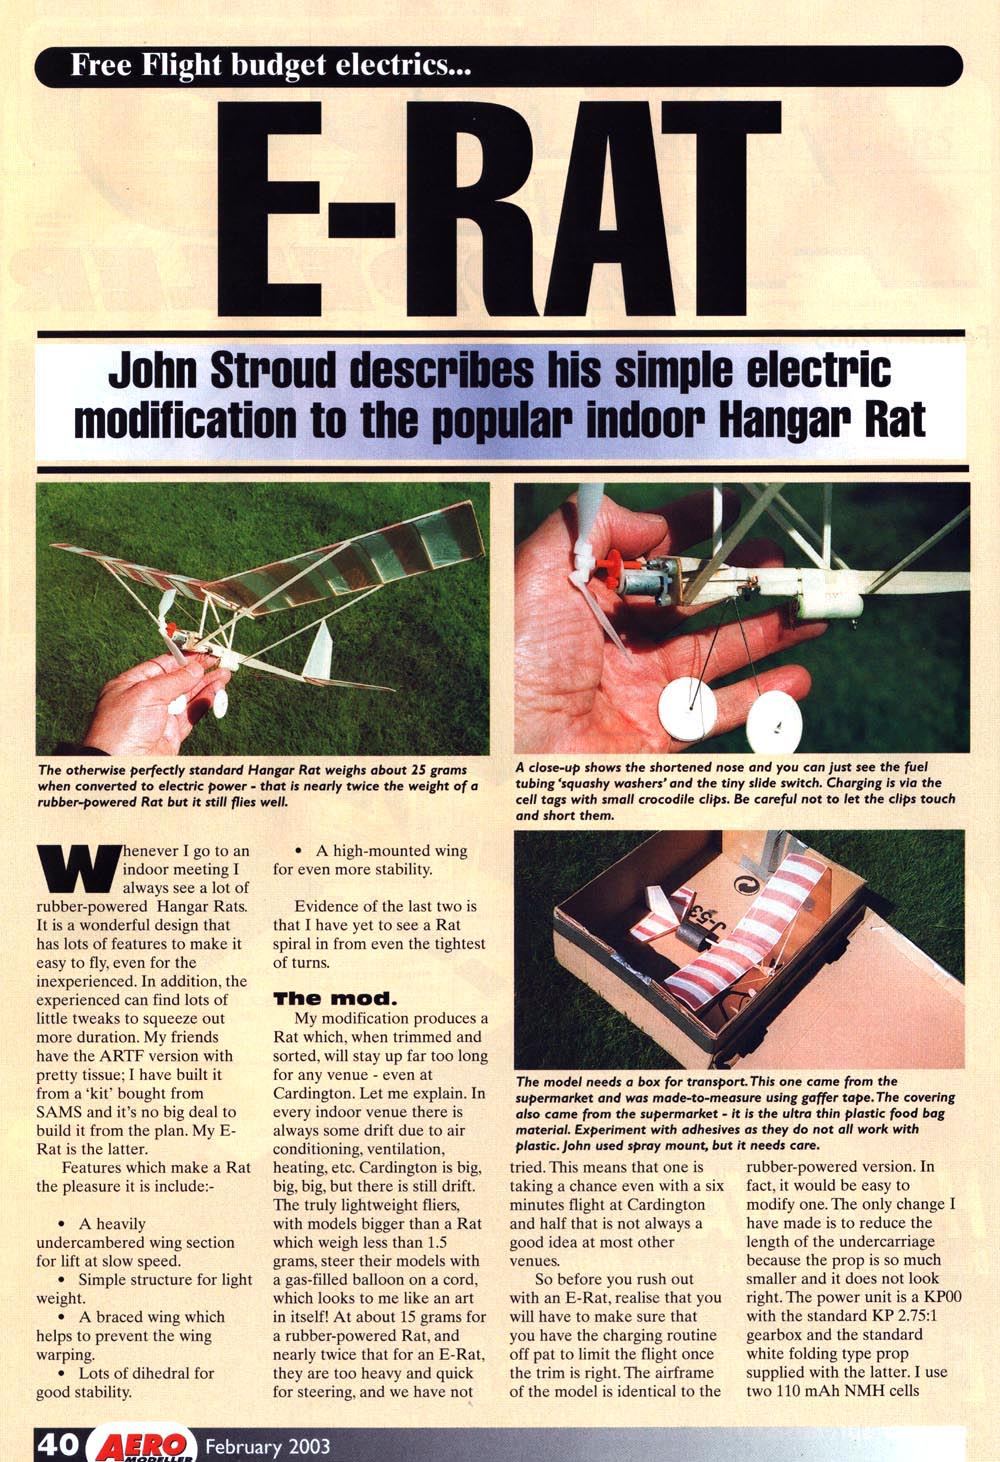 E-RAT Aeromodeller, Feb., 2003 download a 1000pixel image
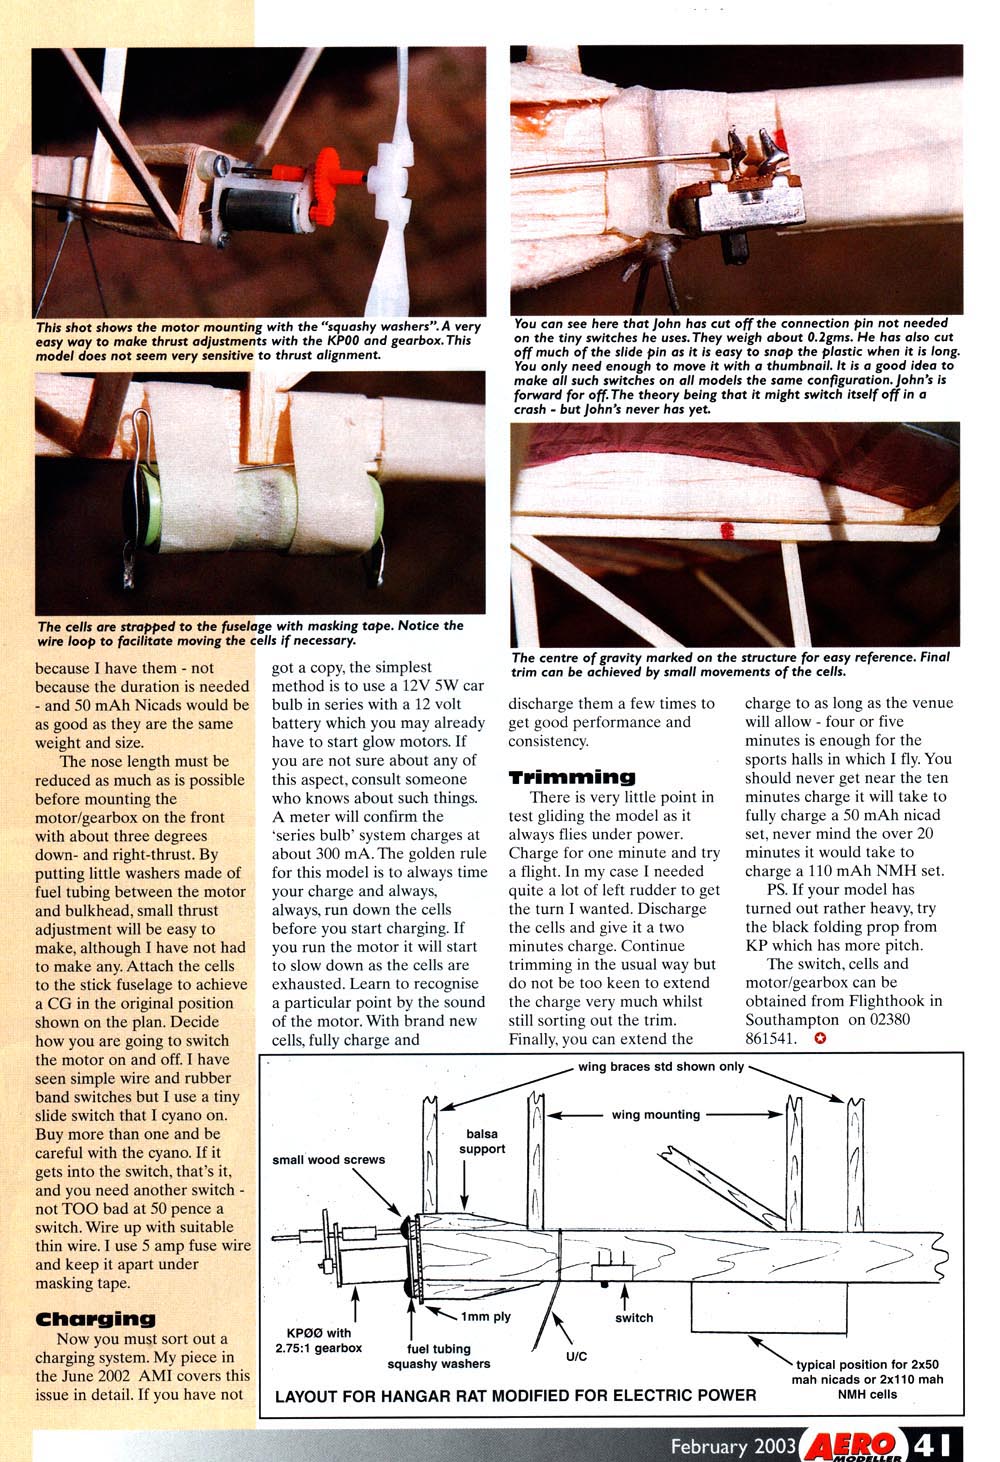 E-RAT Aeromodeller, Feb., 2003 download a 1000pixel image
Dr Bob Allen, (aka 'Dr Bob') member of amongst other clubs the AEFA, is a regular flyer at most monthly meetings and seen here at Donvale in early December 2002 flying his RC Hangar Rat ...more
Along with 'Dr Bob', model aviation microelectronics wizard Reg Regester has also added RC to a Hangar Rat ....more
|
© Copyright 1999-2005 CTIE - All Rights Reserved - Caution |